

Yamaha Handle Switch: The Ultimate Guide
When it comes to motorcycles, every component plays a crucial role in the overall performance and safety of the ride. Among these components, the handle switch is often overlooked, yet it is integral to the rider's control and comfort. In this comprehensive guide, we will delve into everything you need to know about the Yamaha handle switch, from its functions and benefits to installation and maintenance tips. Whether you are a seasoned rider or a beginner, this guide will provide valuable insights into this essential motorcycle part.
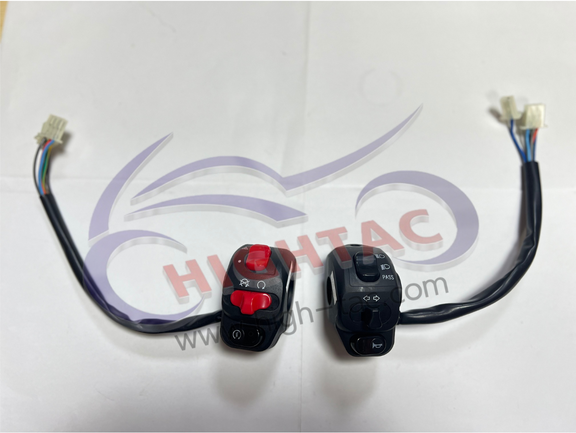
Understanding the Yamaha Handle Switch
What is a Handle Switch?
A handle switch, often referred to as a handlebar switch, is a crucial control mechanism on a motorcycle. It is located on the handlebars and allows the rider to operate various functions such as headlights, turn signals, horn, and engine kill switch without removing their hands from the handlebars. The switch, specifically designed for Yamaha motorcycles, ensures compatibility and optimal performance.
Key Functions of the Yamaha Handle Switch
The Yamaha handle switch controls several vital functions, including:
- Headlights: Turning on and off the headlights, switching between high and low beams.
- Turn Signals: Activating the left or right turn signals to indicate direction changes.
- Horn: Sounding the horn to alert other road users.
- Engine Kill Switch: Quickly shutting off the engine in emergencies.
Understanding these functions is essential for safe and efficient riding.
Benefits of the Yamaha Handle Switch
Enhanced Safety
The primary benefit is enhanced safety. By allowing the rider to control essential functions without removing their hands from the handlebars, the handle switch minimizes distractions and ensures the rider can maintain full control of the motorcycle at all times. This is particularly important in emergency situations where quick reactions are necessary.
Improved Convenience
The switch offers improved convenience by centralizing control functions in one easily accessible location. Riders can quickly and efficiently operate their motorcycle's controls, enhancing the overall riding experience. This convenience is especially beneficial during long rides where fatigue can set in.
Reliability and Durability
Yamaha is renowned for its high-quality motorcycle components, and the switch is no exception. Made from durable materials, the handle switch is designed to withstand the rigors of regular use and harsh weather conditions. This reliability ensures that the handle switch will perform optimally for years, providing peace of mind to riders.
How to Install a Yamaha Handle Switch
Tools and Materials Needed
Before you begin the installation process, gather the following tools and materials:
- New Yamaha handle switch
- Screwdrivers (Phillips and flathead)
- Wrench set
- Electrical tape
- Zip ties
- Owner's manual
Step-by-Step Installation Guide
1. Turn Off the Motorcycle: Ensure the motorcycle is turned off and the key is removed from the ignition to prevent accidental starting.
2. Remove the Old Handle Switch: Use a screwdriver to remove the screws securing the old handle switch. Disconnect the electrical connectors and carefully remove the switch from the handlebars.
3. Install the New Handle Switch: Position the new Yamaha handle switch on the handlebars and secure it with screws. Connect the electrical connectors, ensuring a snug fit.
4. Test the Switch: Turn on the motorcycle and test each function of the new handle switch to ensure everything is working correctly.
5. Secure Wires: Use electrical tape and zip ties to secure any loose wires and prevent them from interfering with the handlebar movement.
Following these steps will ensure a smooth and successful installation of your new Yamaha handle switch.
Maintenance Tips for Yamaha Handle Switch
Regular Inspection
Regularly inspect the switch for signs of wear and tear. Check for loose connections, frayed wires, or any physical damage to the switch. Early detection of potential issues can prevent more significant problems down the road.
Cleanliness
Keep the handle switch clean and free from dirt and debris. Use a soft cloth and mild cleaning solution to wipe down the switch regularly. Avoid using harsh chemicals that can damage the switch's surface or internal components.
Proper Usage
Always use the handle switch as intended and avoid applying excessive force to the buttons and levers. Proper usage will prolong the lifespan of the switch and ensure consistent performance.
Professional Servicing
If you encounter any issues with your switch that you cannot resolve on your own, seek professional servicing. A qualified technician can diagnose and repair any problems, ensuring your handle switch operates safely and efficiently.
Upgrading Your Yamaha Handle Switch
When to Consider an Upgrade
There are several situations where you might consider upgrading your Yamaha handle switch:
- Enhanced Features: If you want to add new features or improve existing ones, upgrading to a more advanced handle switch can provide additional functionalities.
- Improved Performance: Upgrading to a higher-quality handle switch can enhance the overall performance and responsiveness of your motorcycle's controls.
- Aesthetic Appeal: Some riders prefer to upgrade their handle switch to match their motorcycle's aesthetic or to personalize their ride.
Choosing the Right Handle Switch
When selecting a new switch, consider the following factors:
- Compatibility: Ensure the handle switch is compatible with your specific Yamaha motorcycle model.
- Features: Look for a handle switch that offers the features you need, such as integrated lighting controls, hazard lights, or additional buttons for accessories.
- Quality: Choose a handle switch made from high-quality materials to ensure durability and reliability.
Common Issues and Troubleshooting
Unresponsive Switch
If your switch becomes unresponsive, check for the following potential causes:
- Loose Connections: Ensure all electrical connections are secure and free from corrosion.
- Damaged Wires: Inspect the wires for any signs of damage or wear.
- Faulty Switch: If the switch itself is faulty, it may need to be replaced.
Intermittent Functionality
If the handle switch functions intermittently, it may be due to:
- Dirty Contacts: Clean the contacts inside the switch to ensure a reliable connection.
- Moisture: Moisture can cause electrical issues. Ensure the switch is dry and protected from water.
Stuck Buttons
If the buttons on your switch become stuck, try the following:
- Cleaning: Clean around the buttons to remove any dirt or debris causing them to stick.
- Lubrication: Apply a small amount of lubricant to the buttons to ensure smooth operation.
Conclusion
The Yamaha handle switch is a vital component that enhances the safety, convenience, and overall riding experience of Yamaha motorcycles. Understanding its functions, benefits, and maintenance requirements can help you get the most out of your handle switch and ensure your motorcycle operates smoothly. Whether you're installing a new handle switch or upgrading an existing one, following the guidelines in this comprehensive guide will provide you with the knowledge and confidence to handle any situation. Ride safe and enjoy the unparalleled control and performance that a Yamaha handle switch offers.